Git repository on this server: Difference between revisions
| (22 intermediate revisions by the same user not shown) | |||
| Line 1: | Line 1: | ||
Repositories on rtime server are managed by [http://github.com/sitaramc/gitolite Gitolite tool], which allows to conveniently manage repository permissions. World readable repositories can be [http://rtime.felk.cvut.cz/gitweb browsed online]. | Repositories on rtime server are managed by [http://github.com/sitaramc/gitolite Gitolite tool], which allows to conveniently manage repository permissions. World readable repositories can be [http://rtime.felk.cvut.cz/gitweb browsed online]. | ||
In addition to gitolite repositories, users with shell account can create [[Git repositories in home directories|Git repositories in their home directory]]. This does not require any coordination with the administrator. | |||
== Getting write access to repositories == | == Getting write access to repositories == | ||
Write access to | Write access to the repositories can only be given to users who send the following information to the [http://rtime.felk.cvut.cz/~sojka/ administrator]: | ||
# OpenSSH public key | |||
# Login name (for ČVUT people) or email address (for others). | |||
=== SSH key creation === | |||
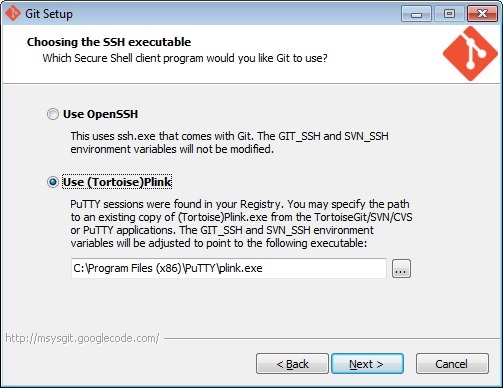
The SSH key can be created with one of the following ways. Note that under Windows, methods 1 and 2 only work if [[Media:git-plink.jpg|OpenSSH]] has been selected during Git installation. | |||
# Under Linux/Unix (or in Git Bash under Windows) run: <pre>ssh-keygen</pre> | |||
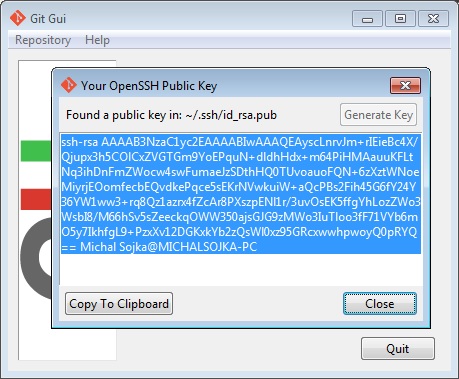
# In Git Gui (under Linux or Windows) choose [[Media:Git-gui-key.jpg|Help -> Show SSH key -> Generate key]]. | |||
# Under Windows use PuTTYgen. Use this if you have chosen to [[Media:git-plink.jpg|use Plink]] during Git installation. | |||
It is stored by default at <tt>~/.ssh/id_rsa.pub</tt>. | It is stored by default at <tt>~/.ssh/id_rsa.pub</tt>. | ||
=== Password-protected keys === | |||
During the key creation you will be asked for a passphrase. If you do not specify any passphrase, anybody with access to your <tt>~/.ssh</tt> directory could access your repositories. If you specify the passphrase, it will need to be entered whenever you want to push to or pull from the server. By using <tt>ssh-add</tt> command (or Pageant program under Windows) you can specify the passphrase only once and the decrypted key will be remembered in the memory. | |||
== Creating repositories == | |||
# Send an email to the [http://rtime.felk.cvut.cz/~sojka/ administrator] with the name of the repository, a short description and a list of people ( | There are two ways how a repository can be created: | ||
# Send an email to the [http://rtime.felk.cvut.cz/~sojka/ administrator] with the name of the repository, a short description and a list of people (login or email) who should have access to the repository. The administrator creates the repository for you and notifies you when it's done. | |||
# Our group staff members can create their repositories without asking the administrator. See below. | # Our group staff members can create their repositories without asking the administrator. See below. | ||
| Line 26: | Line 39: | ||
This will create a new repository called «whatever» (if it does not exist yet) and push the current HEAD to it. It also makes this repository the default for pushing and pulling (this is what --set-upstream does). | This will create a new repository called «whatever» (if it does not exist yet) and push the current HEAD to it. It also makes this repository the default for pushing and pulling (this is what --set-upstream does). | ||
If you want to set a [https://rtime.felk.cvut.cz/gitweb/orte.git Gitweb description] for repositories created this way, use gitolite's | Such repository is by default accessible only to the creator. If you want this repository to be public, run | ||
ssh git@rtime.felk.cvut.cz perms «login»/«whatever» + READERS @all | |||
If you want to set a [https://rtime.felk.cvut.cz/gitweb/orte.git Gitweb description] for public repositories created this way, use gitolite's desc commands. I.e. you can set the description by: | |||
ssh git@rtime.felk.cvut.cz desc «login»/«whatever» "Description" | |||
== Accessing the repository == | == Accessing the repository == | ||
| Line 41: | Line 57: | ||
Read-only access (for public repositories only): | Read-only access (for public repositories only): | ||
git clone git://rtime.felk.cvut.cz/''repo-name''.git | git clone git://rtime.felk.cvut.cz/''repo-name''.git | ||
git clone http://rtime.felk.cvut.cz/git/''repo-name''.git | |||
=== First push === | === First push to admin-created repositories === | ||
After an empty repository is created | After an empty repository is created by the admin, you can push (i.e. upload) the data to it: | ||
* [[#Cloning the repository|Clone]] the empty repository. | * [[#Cloning the repository|Clone]] the empty repository. | ||
| Line 57: | Line 74: | ||
If you are not allowed to push to the master branch but to a different one, you have to push like this: | If you are not allowed to push to the master branch but to a different one, you have to push like this: | ||
git push origin master:your-branch | git push origin master:your-branch | ||
which pushes your local master branch to the remote your-branch | which pushes your local master branch to the remote branch ''your-branch''. | ||
To make this behavior default run | To make this behavior default run | ||
| Line 65: | Line 82: | ||
git push | git push | ||
== Managing | == Managing repositories == | ||
=== Finding available repositories === | === Finding available repositories === | ||
| Line 74: | Line 91: | ||
where filter is optional string used to filter the list. | where filter is optional string used to filter the list. | ||
=== Permissions to automatic repositories === | === Permissions to automatic repositories === | ||
The owners of automatically created repositories can manage the access permissions by themselves | The owners of automatically created repositories can manage the access permissions by themselves. | ||
The current permissions can be listed by: | |||
ssh git@rtime.felk.cvut.cz perms -l «repo» | |||
You can add permissions for either reading of writing the repo with: | |||
ssh git@rtime.felk.cvut.cz perms «repo» + READERS «login» | |||
ssh git@rtime.felk.cvut.cz perms «repo» + WRITERS «login» | |||
The permissions can be removed by replacing '''+''' with '''-'''. | |||
[https://rtime.felk.cvut.cz/gitweb/ | To make your repository visible on [https://rtime.felk.cvut.cz/gitweb/ gitweb], run: | ||
ssh git@rtime.felk.cvut.cz perms «repo» + READERS @all | |||
== Links to git related documents == | == Links to git related documents == | ||
Latest revision as of 13:54, 12 April 2019
Repositories on rtime server are managed by Gitolite tool, which allows to conveniently manage repository permissions. World readable repositories can be browsed online.
In addition to gitolite repositories, users with shell account can create Git repositories in their home directory. This does not require any coordination with the administrator.
Getting write access to repositories
Write access to the repositories can only be given to users who send the following information to the administrator:
- OpenSSH public key
- Login name (for ČVUT people) or email address (for others).
SSH key creation
The SSH key can be created with one of the following ways. Note that under Windows, methods 1 and 2 only work if OpenSSH has been selected during Git installation.
- Under Linux/Unix (or in Git Bash under Windows) run:
ssh-keygen
- In Git Gui (under Linux or Windows) choose Help -> Show SSH key -> Generate key.
- Under Windows use PuTTYgen. Use this if you have chosen to use Plink during Git installation.
It is stored by default at ~/.ssh/id_rsa.pub.
Password-protected keys
During the key creation you will be asked for a passphrase. If you do not specify any passphrase, anybody with access to your ~/.ssh directory could access your repositories. If you specify the passphrase, it will need to be entered whenever you want to push to or pull from the server. By using ssh-add command (or Pageant program under Windows) you can specify the passphrase only once and the decrypted key will be remembered in the memory.
Creating repositories
There are two ways how a repository can be created:
- Send an email to the administrator with the name of the repository, a short description and a list of people (login or email) who should have access to the repository. The administrator creates the repository for you and notifies you when it's done.
- Our group staff members can create their repositories without asking the administrator. See below.
Automatic creation of repositories (staff members only)
It is simply a matter of pushing the repository to a special URL containing the login, like this:
git push --set-upstream ssh://git@rtime.felk.cvut.cz/«login»/«whatever» HEAD
This will create a new repository called «whatever» (if it does not exist yet) and push the current HEAD to it. It also makes this repository the default for pushing and pulling (this is what --set-upstream does).
Such repository is by default accessible only to the creator. If you want this repository to be public, run
ssh git@rtime.felk.cvut.cz perms «login»/«whatever» + READERS @all
If you want to set a Gitweb description for public repositories created this way, use gitolite's desc commands. I.e. you can set the description by:
ssh git@rtime.felk.cvut.cz desc «login»/«whatever» "Description"
Accessing the repository
After installing Git on your local computer, you can access the repository as follows.
Cloning the repository
Read/Write access (for users with registered SSH key):
git clone ssh://git@rtime.felk.cvut.cz/repo-name
Read-only access (for public repositories only):
git clone git://rtime.felk.cvut.cz/repo-name.git
git clone http://rtime.felk.cvut.cz/git/repo-name.git
First push to admin-created repositories
After an empty repository is created by the admin, you can push (i.e. upload) the data to it:
- Clone the empty repository.
- Put your sources into your cloned repository
git add .             # tells git to track all files in your project
git commit            # commits the added files to the repository
- Push your sources to the server
git push
Pushing to non-master branches
If you are not allowed to push to the master branch but to a different one, you have to push like this:
git push origin master:your-branch
which pushes your local master branch to the remote branch your-branch.
To make this behavior default run
git config remote.origin.push master:your-branch
And from now on, it is sufficient to run only
git push
Managing repositories
Finding available repositories
You can find the list of repositories you have access to by running:
ssh git@rtime.felk.cvut.cz info [filter]
where filter is optional string used to filter the list.
Permissions to automatic repositories
The owners of automatically created repositories can manage the access permissions by themselves.
The current permissions can be listed by:
ssh git@rtime.felk.cvut.cz perms -l «repo»
You can add permissions for either reading of writing the repo with:
ssh git@rtime.felk.cvut.cz perms «repo» + READERS «login»
ssh git@rtime.felk.cvut.cz perms «repo» + WRITERS «login»
The permissions can be removed by replacing + with -.
To make your repository visible on gitweb, run:
ssh git@rtime.felk.cvut.cz perms «repo» + READERS @all